


Vessel sink installation looks simple because most of the bowl remains visible above the counter. On a project, however, the basin, faucet, waste, mirror, countertop, and cabinet must work as one layout. A few millimetres in the wrong direction can leave the water stream close to the rim, reduce cleaning space, or make a row of guestrooms look inconsistent.
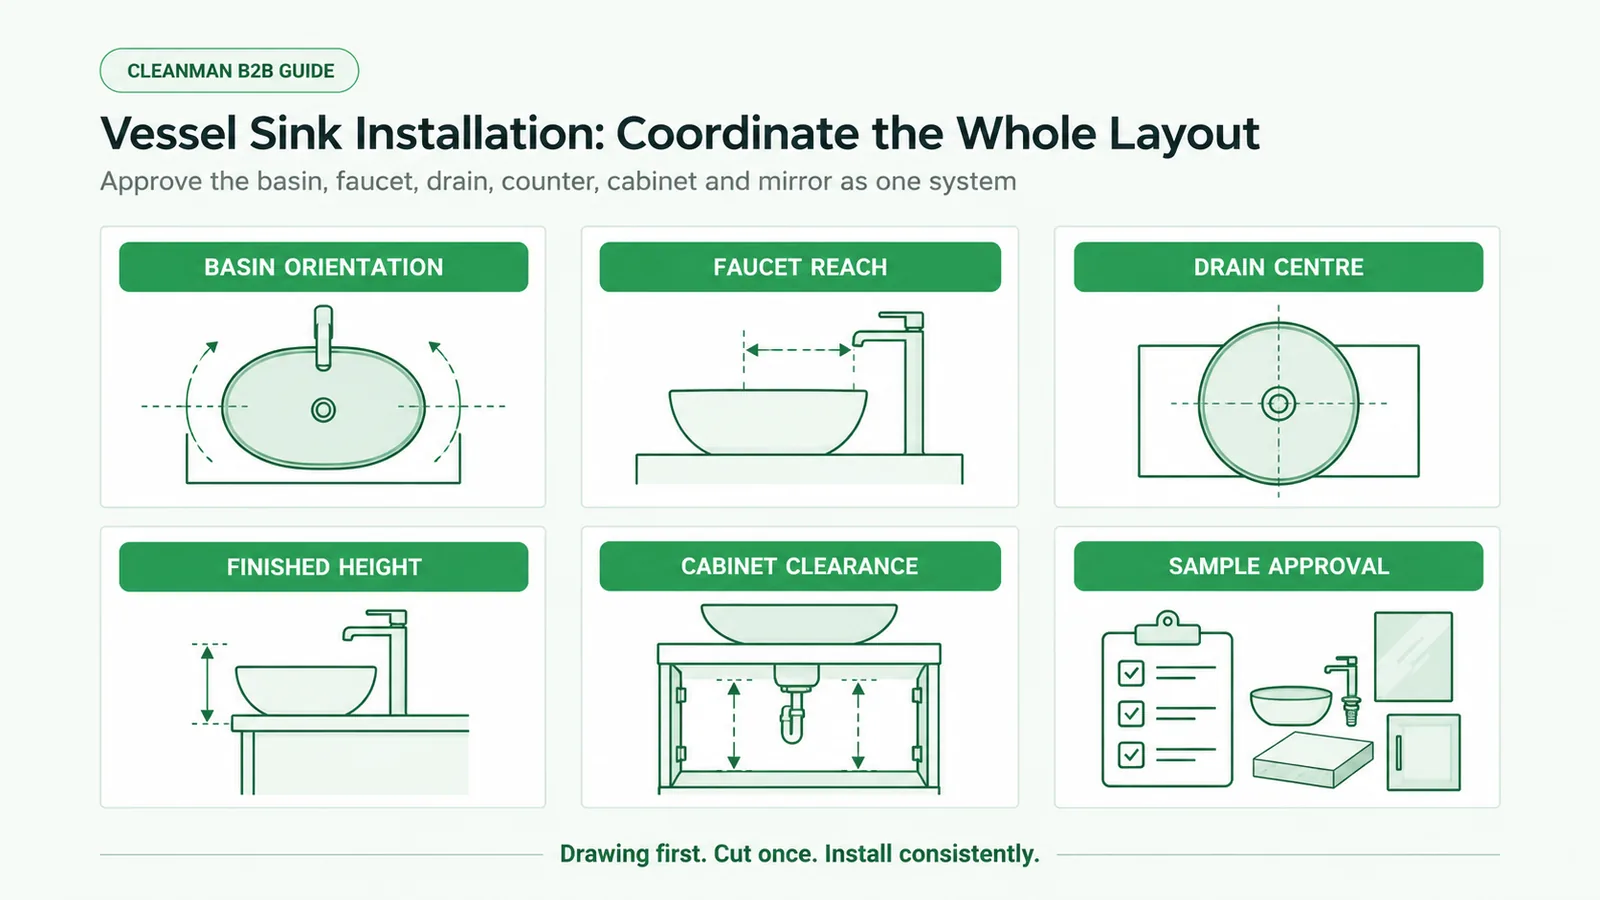
This guide is written for importers, distributors, contractors, and project buyers. It focuses on the decisions that should be settled before bulk installation rather than on one universal set of dimensions. Every basin and faucet combination is different, so the approved product drawing and the physical sample remain the final references.
What is a vessel sink?
A vessel sink is an above-counter basin. Most of the ceramic body sits on the finished countertop instead of being recessed below it. American Standard describes its Ovale model as an above-counter vessel sink and notes that it can use either a wall-mounted or counter-mounted faucet. That distinction matters at the drawing stage because faucet type changes the required counter space, wall preparation, and service access.
The term does not describe one fixed shape. Vessel sinks may be round, oval, rectangular, asymmetric, shallow, or deep. Some have an overflow and some do not. The buyer should therefore confirm the exact model rather than issue a generic “vessel basin” instruction to every installer.
Start vessel sink installation with the approved drawing
Do not cut the countertop from a catalogue photograph. Use the current technical drawing or the physical template supplied for the approved model. American Standard, for example, lists a cutout template with several of its above-counter basins. The template controls the opening, while the product drawing confirms the overall footprint, height, waste position, and any flat contact area under the bowl.
Before releasing a stone or solid-surface counter for production, place these items on one coordinated drawing:
- basin outline and long-axis direction;
- waste-hole centre;
- faucet-hole centre or wall-spout centre;
- front counter edge and rear wall line;
- mirror centreline;
- cabinet rails, drawers, traps, and supply connections below the counter.
This plan view catches conflicts before the counter reaches the site. It is especially important for asymmetric bowls. An installer can rotate a round basin without changing the user position, but a directional basin has a clear front, back, and long side.
Align the faucet with the drain
For a deck-mounted faucet behind the basin, the user normally stands on the opposite long side. Viewed from that position, the faucet outlet should sit on the same working centreline as the drain. Delta advises positioning a vessel faucet so the water hits the drain directly. The rule gives the project team a practical starting point, but the final check must include the actual spout reach, outlet height, bowl slope, and water flow.
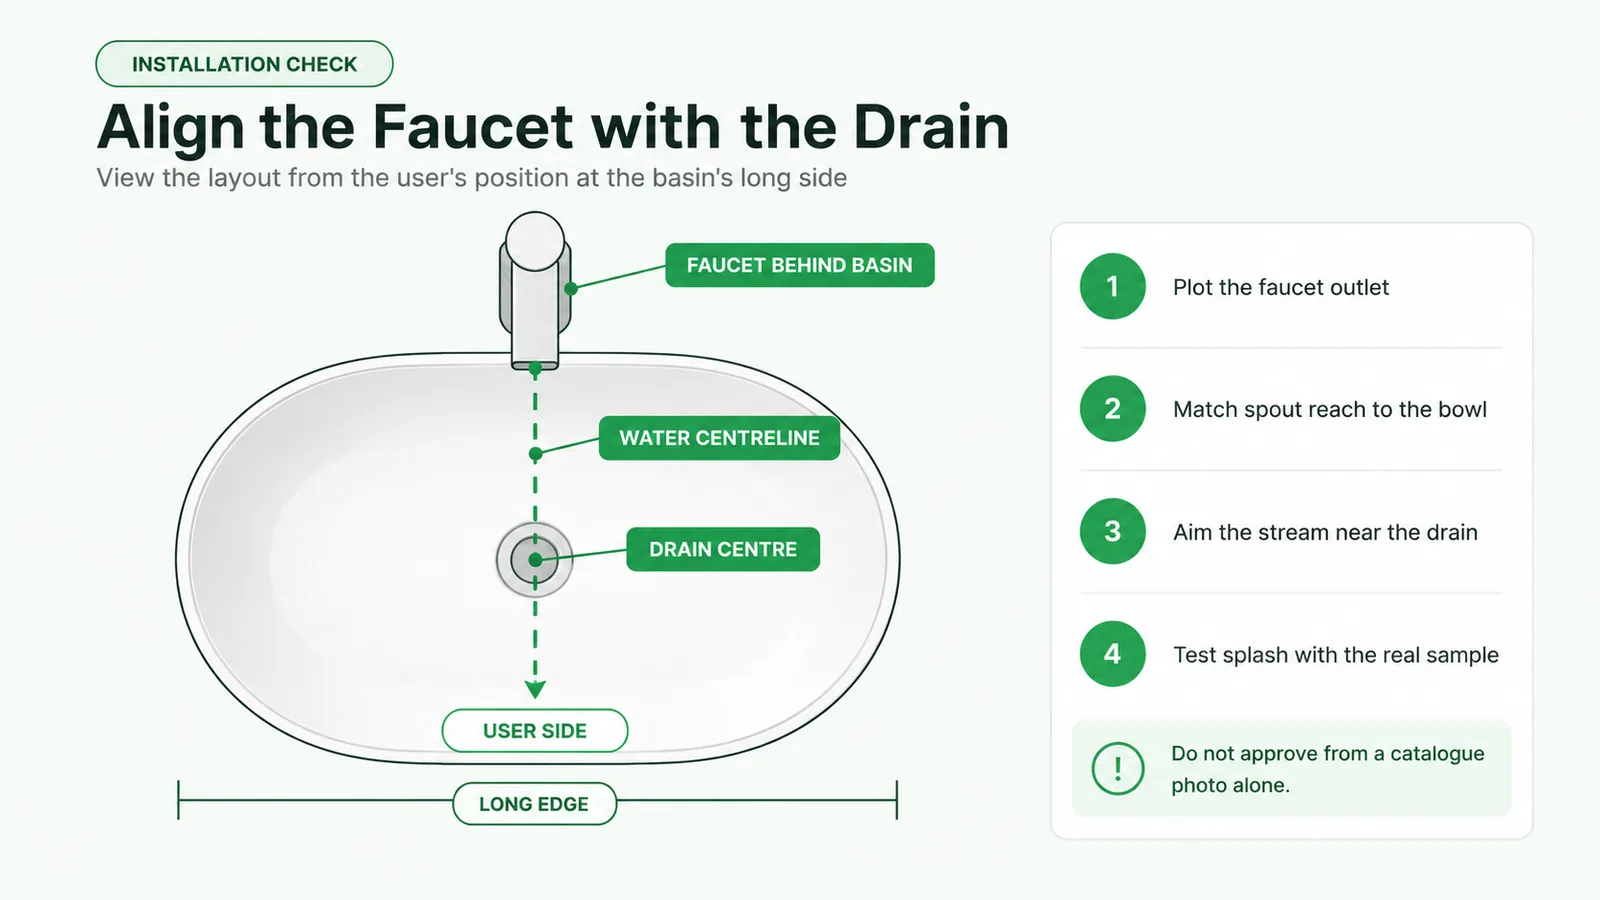
A stream that lands too close to the rear wall of the bowl may splash back. A short spout may discharge onto the rim, while an excessively long spout can push the working area too far forward. Kohler’s vessel-faucet specifications publish both spout reach and spout height for this reason. Ask the faucet supplier for the same two measurements and plot them against the basin section drawing.
Do not rely on “tall faucet” as a specification. Two tall faucets can have very different reach. The useful dimension is the relationship between the outlet, the inner bowl, and the drain.
Keep the counter and room geometry consistent
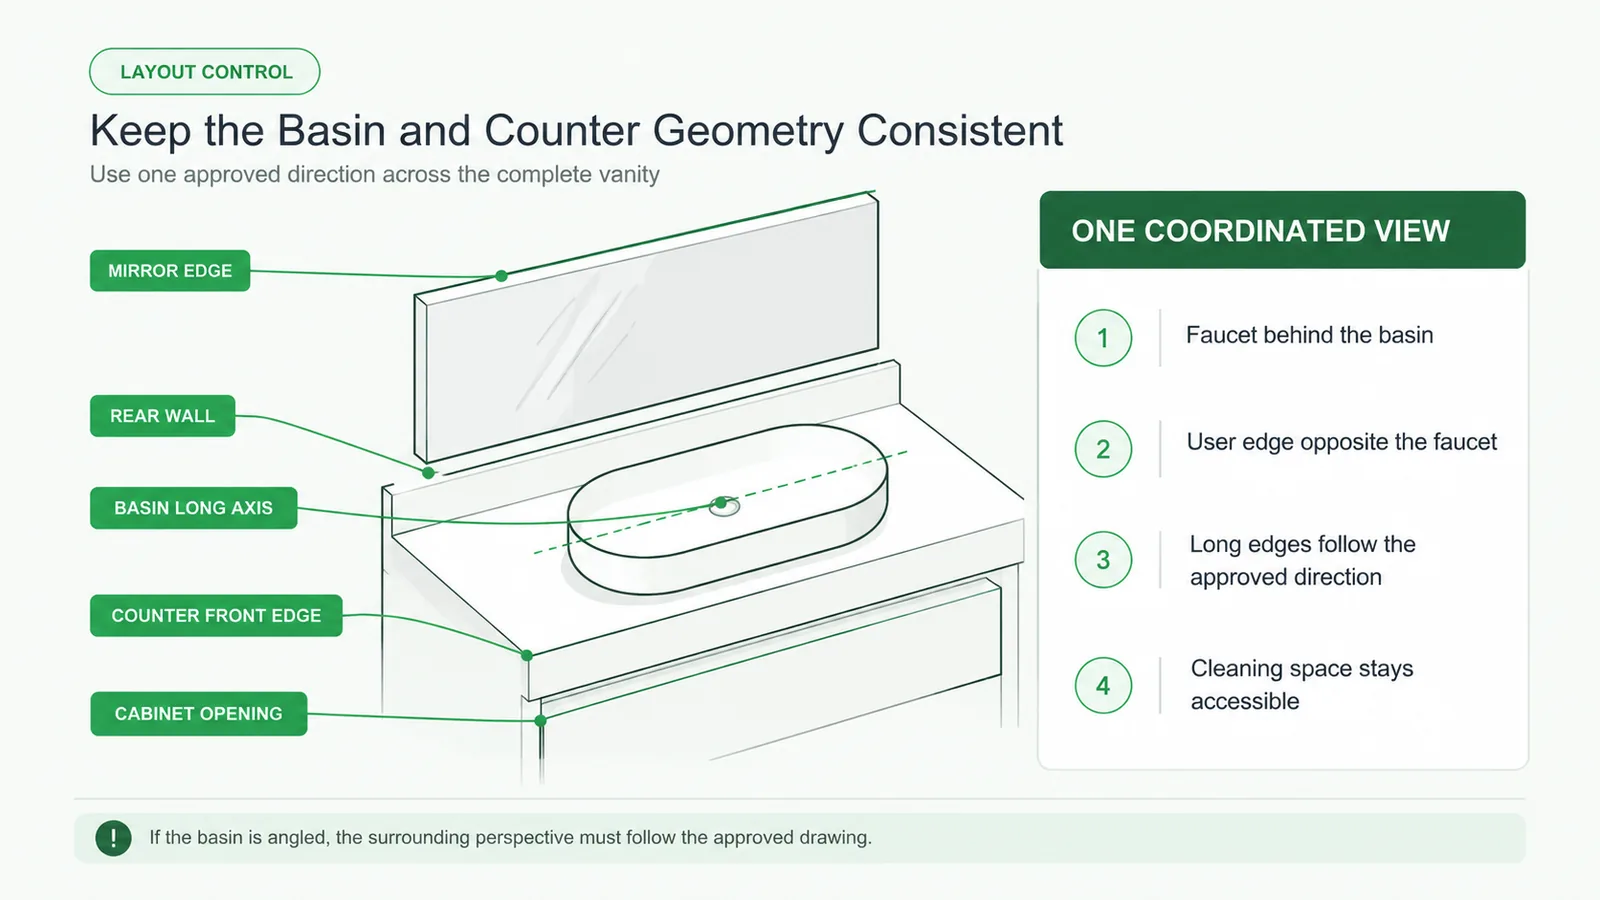
The basin does not sit alone in the photograph or on site. The front counter edge, cabinet opening, rear wall joint, mirror, and basin long axis should follow one coherent layout. If the basin is intentionally placed at a slight angle, those surrounding lines must follow the approved design. Otherwise, the installation looks accidental even when every component is individually level.
For a conventional arrangement, set the faucet behind the basin, keep the user edge opposite it, and run the front edge parallel to the basin’s long side. Leave enough space to wipe around the ceramic body and reach the faucet base. There is no single clearance that fits every product; a compact guestroom vanity and a large commercial counter need different answers. Test the real sample with the intended cleaning tools and accessories.
Check the finished height, not only the counter height
A vessel sink adds the bowl height above the counter. If a standard vanity is used without adjustment, the finished rim can become uncomfortable for the target user. Kohler’s planning guidance recommends considering countertop dimensions and sink height together before choosing the basin.
Project teams should record the finished floor-to-rim height on the approval drawing. Then confirm the faucet outlet height, mirror position, accessory height, and user reach around that reference. Accessible rooms require their own code review and should not inherit dimensions from a standard guestroom.
Match the waste to the overflow configuration
Confirm whether the basin has an overflow before ordering the waste assembly. A basin without an overflow needs a compatible non-overflow drain. Delta’s product guidance, for example, distinguishes drain models with overflow openings from models intended for sinks without an overflow.
Below the counter, check the waste tailpiece, trap, drawer travel, shelf position, and service access. A beautiful top view does not solve a collision inside the cabinet. The project drawing should show enough information for the cabinet, stone, plumbing, and sanitary-ware suppliers to review the same assembly.
Approve one complete sample bay before bulk work
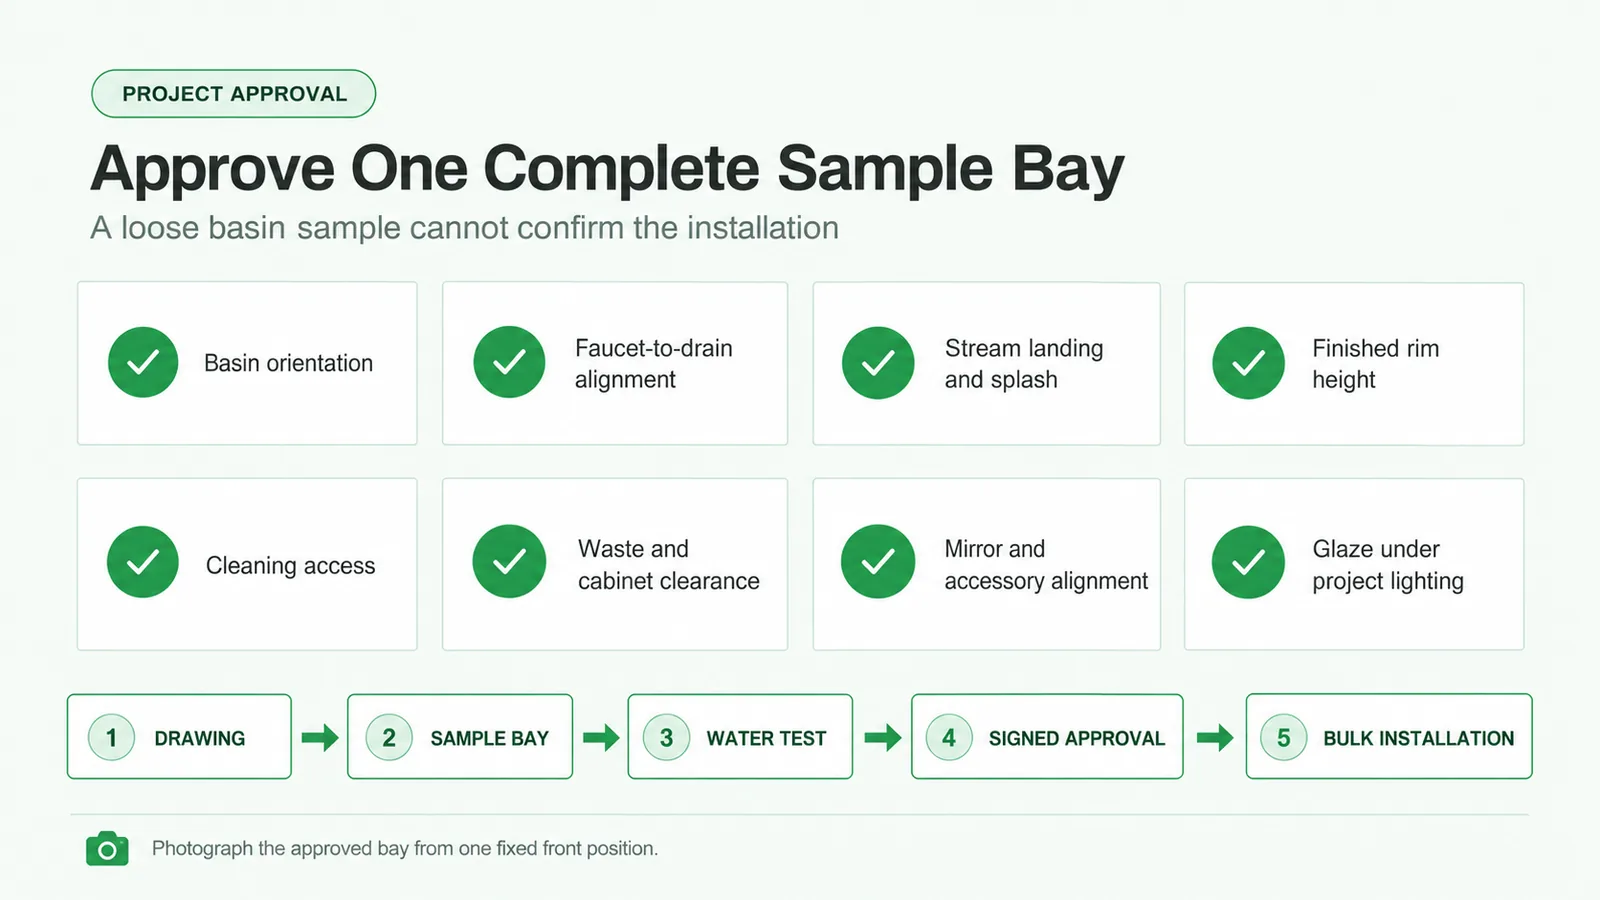
A loose basin sample confirms colour and shape. A complete sample bay confirms the installation. Build one bay with the production countertop material, specified faucet, actual waste, trap, mirror, cabinet, and sealant colour. Then run water and inspect the result from the user’s position.
The approval team should check:
- basin orientation and centring;
- faucet-to-drain alignment;
- stream landing point and splash behaviour;
- rim height and comfortable reach;
- cleaning access around the basin and faucet;
- waste sealing, drainage, and cabinet clearance;
- mirror and accessory alignment;
- glaze appearance under the project lighting.
Photograph the approved bay from a fixed front position and save the signed drawing with the sample record. Those two references give installers and inspectors a common standard across floors, buildings, or production batches.
Information to include in a vessel sink RFQ
A useful request for quotation should identify the basin model, finish, quantity, destination, required certification, target delivery date, and packing expectations. Attach the vanity drawing if the faucet or counter has already been selected. State whether you need a cutout template, installation guide, waste assembly, branded carton, barcode label, or inspection documents.
For mixed bathroom schedules, provide the quantity by room type. Standard rooms, accessible rooms, suites, and public washrooms may use different counters or fittings even when the ceramic finish is the same.
Questions project buyers ask
Can the same cutout be used for several vessel sink models?
Only when the supplier confirms the contact area, waste position, and template are identical. Similar outer dimensions do not guarantee the same cutout.
Should the faucet always sit behind the basin?
No. A wall-mounted or side-mounted layout can work when it appears on the approved drawing. For the common rear deck-mounted arrangement, keep the user on the opposite side and verify that the outlet aligns with the intended landing point near the drain.
Does CLEANMAN support OEM or project orders?
CLEANMAN can review OEM branding, packing, product selection, and project documentation according to the model and order requirements. Send the target market, quantity, finish, and delivery plan for confirmation.
What should be approved before mass installation?
Approve the exact basin and faucet combination, coordinated drawing, countertop template, finished rim height, waste configuration, sealant detail, and one functioning sample bay.
Plan the installation before the counter is cut
Good vessel sink installation begins before the installer opens a toolbox. Coordinate the basin, faucet, counter, cabinet, waste, mirror, and user position on one drawing. Then prove the arrangement with a complete sample bay. Browse the CLEANMAN basin collection, including the directional CL-1409 vessel sink, and send your vanity plan to CLEANMAN for a model-specific review.
Technical references: Kohler vessel sink installation planning; Delta vessel faucet specifications and installation guidance; American Standard Ovale above-counter vessel sink.

