

Introduction: Why the Right Undermount Basin Installation Sells the Project
If you are an importer, wholesaler, or project manager sourcing for high-end developments, you know that the “look” of a bathroom or kitchen is a major selling point. The undermount basin installation has become the gold standard in modern design. It creates a seamless, continuous line from the countertop into the bowl, making the space feel larger, sleeker, and significantly easier to clean.
But when you are importing hundreds of units from overseas, beauty is only half the battle. You need reliability. A poor installation leads to sagging sinks, water-damaged cabinetry, and expensive insurance claims. Because an undermount sink is fitted beneath the countertop rather than resting on top of it, the entire weight of the basin and its water volume relies on the strength of the mounting system and the quality of the seal.
In this guide, I’ll share the professional process for mounting these basins to ensure your projects stand the test of time and meet the rigorous standards of international buyers. You will also see a case study of our guidance to a customer, who is new in ceramic basin industry, to grow their business safely and steadily.

Step 0: Choosing the Right Manufacturer (Pre-Ordering)
Before a single tool is lifted, the success of your undermount basin installation starts with your sourcing strategy. Not all ceramic basins are created equal.
What to Ask the Factory
When you are vetting a manufacturer for ceramic undermount basins, you must request three critical items:
1. Load Test Reports:
Ceramic is heavy. Ask for certified testing that proves the basin rim can withstand the combined weight of the sink, a full volume of water, and the pressure of a garbage disposal without cracking or detaching.
2. Real-World Installation Images:
A reputable factory should provide photos of their products installed in various countertop materials (granite, quartz, solid surface) to demonstrate fit and finish.
3. Physical or Digital Cutting Templates:
Precision is everything. Ensure the factory provides accurate 1:1 templates. A 2mm error in the template can lead to a visible “reveal” gap that ruins the high-end look.
Pro Tip: If a factory cannot provide a precise template, it is a red flag that their quality control might be lacking.
Phase 1: The Professional’s Toolkit
Before your team even picks up a tool, they need a specific kit. For a professional-grade undermount basin installation, you cannot cut corners on materials.
Essential Tools for the Job
Jigsaw or Router: Necessary for cutting the sink opening in the countertop.
Specific Blades: It is vital to select blades based on the countertop material, such as quartz, stainless steel, or wood.
Drill: Used for creating pilot holes and securing the mounting clips that hold the basin’s weight.
Caulking Gun: Essential for applying the silicone sealant that creates the watertight barrier.
Level and Tape Measure: Accuracy is the difference between a high-end finish and a project failure.
Clamps: These hold the sink in position while the adhesive sets, ensuring no shifting occurs.
Safety Gear: Gloves, safety glasses, and ear protection are crucial during the cutting process.
Key Materials
High-Quality Silicone Sealant: Always use a mildew-resistant silicone caulk to ensure a secure, watertight seal.
Mounting Brackets and Screws: These are necessary for securing the sink to the countertop.
Denatured Alcohol: Used for cleaning surfaces before applying sealant to ensure a maximum bond.
Mineral Spirits: Helpful for cleaning tools and surfaces after the installation.
Cutting Template: Use this to verify that the basin dimensions are correct before you begin any cutting or installation.
Phase 2: Preparing for a Flawless Fit
Preparation is where most installations succeed or fail. I always tell my clients: “If the surface isn’t clean, the sink won’t stay.”
Cleaning and Surface Prep
Before the sink is positioned, the countertop opening must be prepared. This involves thoroughly cleaning the rim of the sink and the underside of the countertop with denatured alcohol. This step removes dust, grease, or debris that could compromise the adhesion of the sealant.
The Dry Fit and Clearance Check
Never apply sealant without a “dry fit” first. Place the sink against the cutout to confirm it aligns correctly. You must also check for clearance on all sides under the countertop to ensure there is enough room for mounting hardware.
For developers who need certified quality that fits international standards, our cUPC certified bathroom basin undermount is a top choice for North American and European markets.
Bathroom Basin Undermount CL-2140 | cUPC Certified Ceramic Basin
Phase 3: The Step-by-Step Mounting Process
This is the “make or break” phase of the undermount basin installation.
Step 1: Dimensional Verification with Template
Before any cutting begins, place the physical basin onto the provided cutting template to ensure it corresponds correctly. This confirms that the sink dimensions match the specified cutout exactly, preventing costly errors on expensive stone or quartz surfaces.
Step 2: Cleaning and Preparation
Thoroughly clean the rim of the sink and the underside of the countertop with denatured alcohol. As shown in the manual’s first step, removing dust, grime, or moisture is critical for the silicone to bond properly.
Step 3: Applying the Sealant
Using a caulking gun, apply a generous, continuous bead of silicone sealant around the entire rim of the basin. This creates the watertight barrier seen in the manual’s second step.
Step 4: Positioning from Below
Lift the basin from inside the cabinet and press it firmly into the cutout. Immediately secure it using the mounting clips (hooks), tightening them evenly to compress the silicone without damaging the materials, exactly as illustrated in the manual’s third and fourth steps.
Step 5: The 24-Hour Cure
The silicone needs time to cure and harden completely, typically 12–24 hours. As the 24-hour icon in the manual emphasizes, do not run water or attach any plumbing until this time has passed.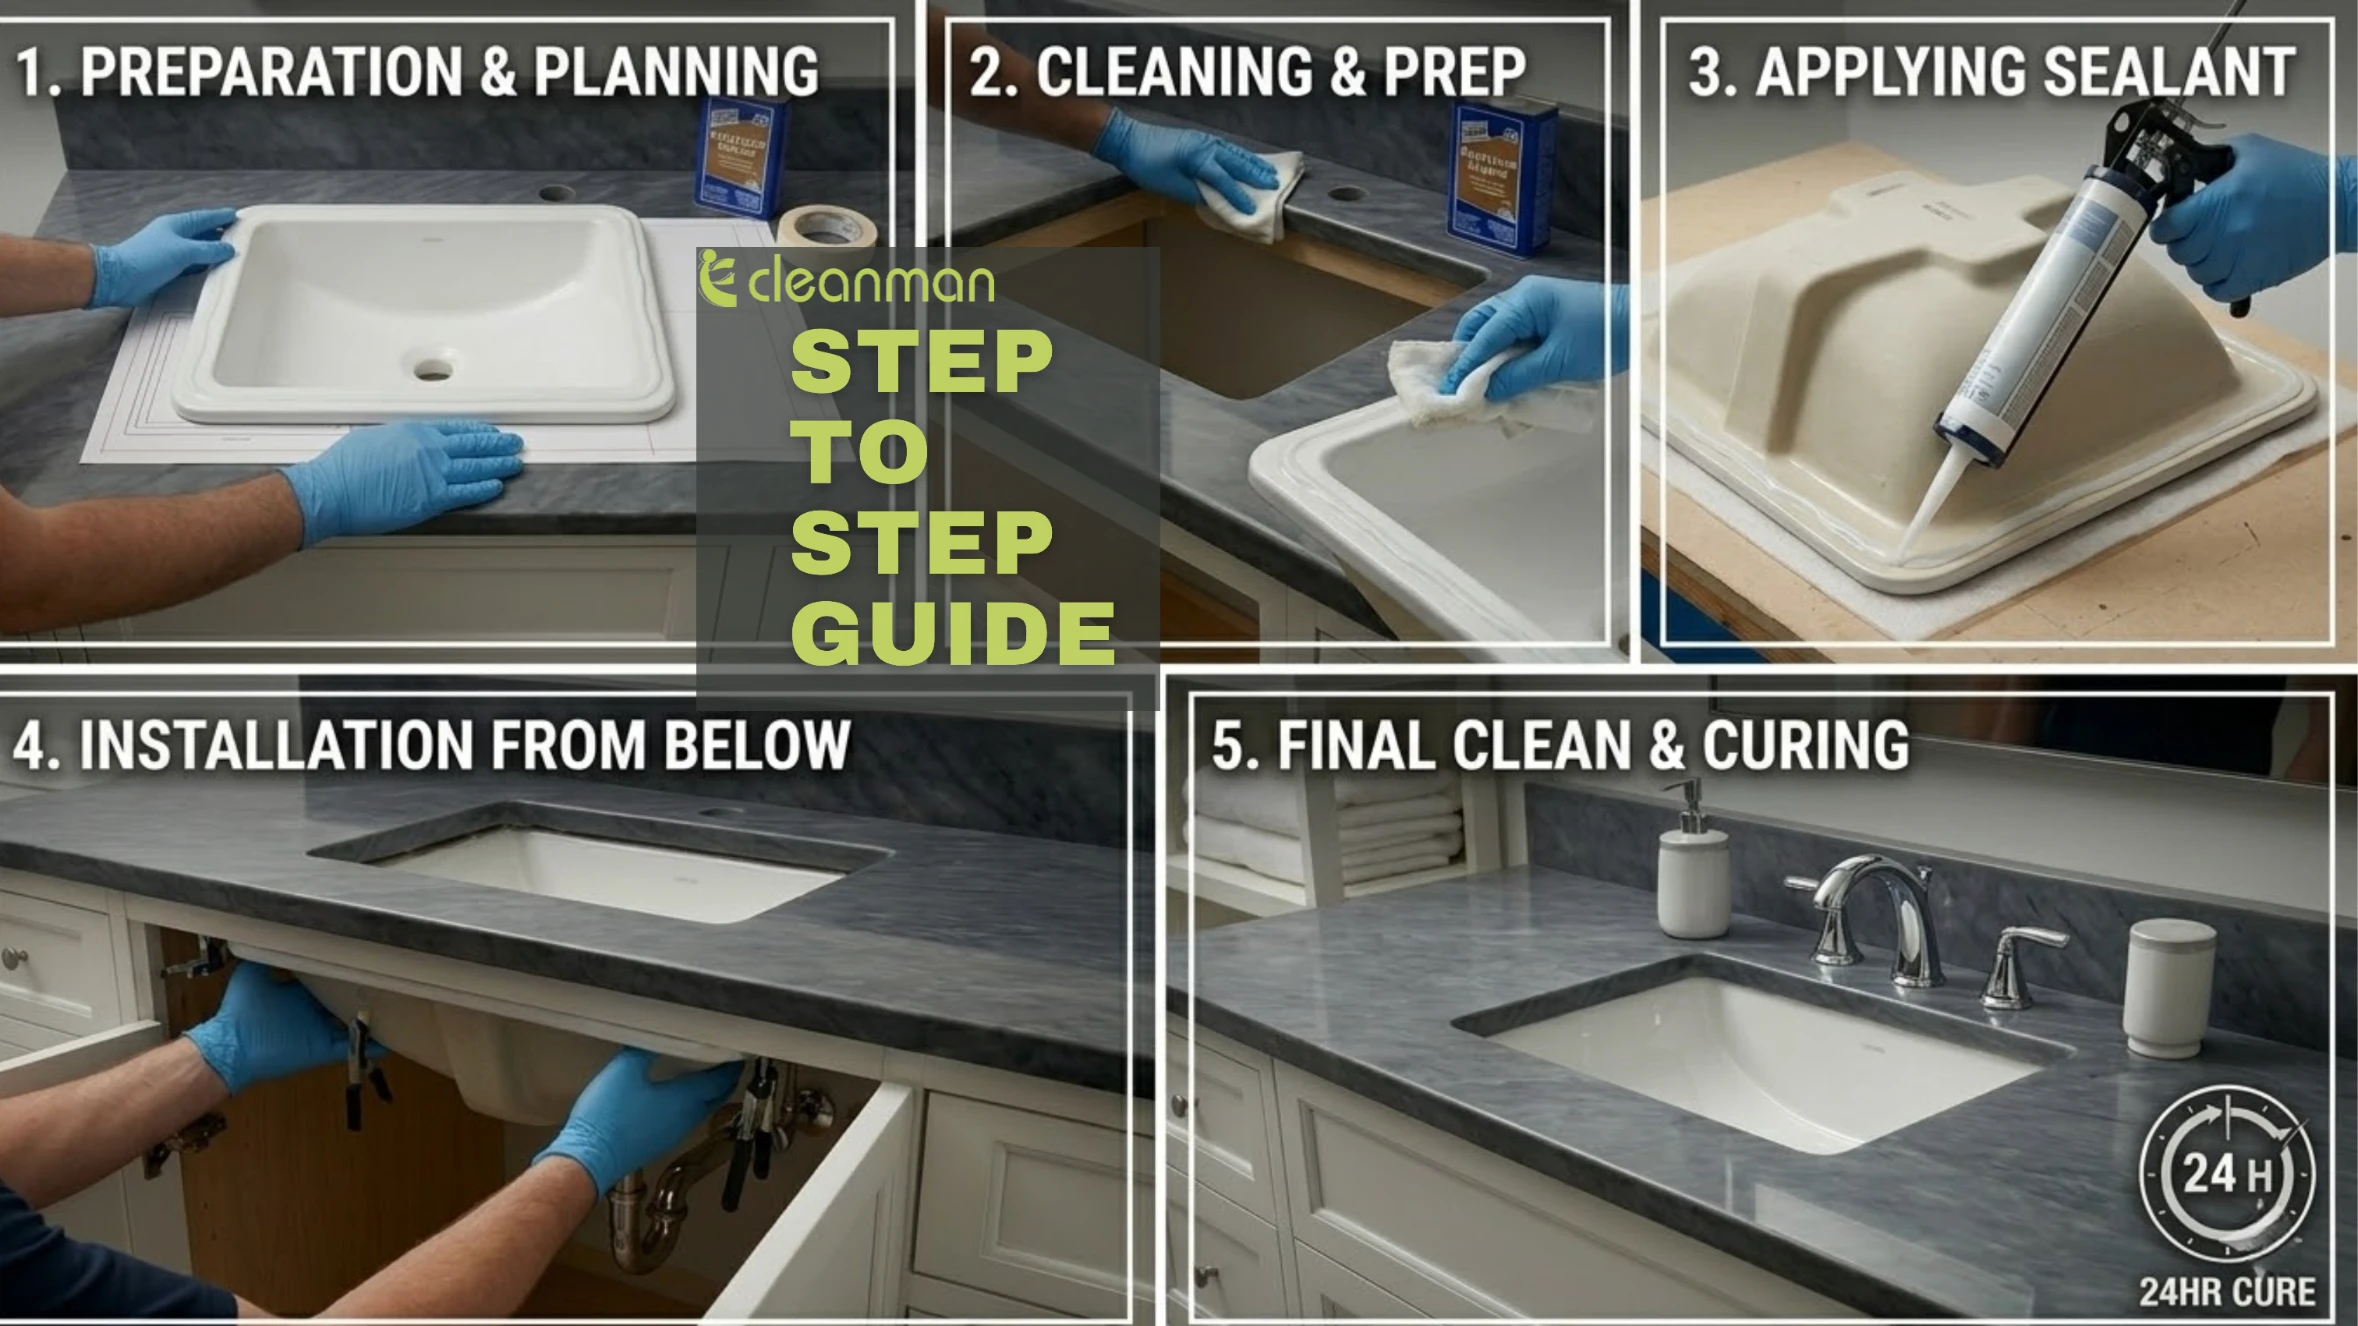
Phase 4: Post-Installation Inspection
After the installation is complete, a thorough inspection ensures the sink functions properly.
Check for Gaps: Look for any uneven areas between the sink and the countertop.
Tighten Connections: Check all plumbing connections (faucet and drain) to identify any leaks.
Leak Test: Activate the water supply and address any leaks immediately to prevent long-term damage.
For a wide variety of styles and configurations, browse our full collection of undermount basins to find the perfect fit for your next commercial project.
Phase 5: Common Pitfalls and How to Avoid Them
Even with a clear process, issues can arise if the team isn’t vigilant.
Improper Installation and Weight Support
One of the most frequent causes of failure is incorrect measurements of the cabinet or countertop cutout. If the sink isn’t secured with the correct hardware, it may sag or even detach over time. Heavier materials like stone or composite basins require a sturdy, non-porous countertop and may need additional support structures made from plywood or brackets.
Deterioration of Sealant
Over time, the sealant may deteriorate, leading to leaks. We recommend that property managers inspect the caulking every six months. Identifying signs of wear early can prevent significant water damage and mold growth.
Improper Installation and Weight Support
One of the most frequent causes of failure is incorrect measurements of the cabinet or countertop cutout. If the sink isn’t secured with the correct hardware, it may sag or even detach over time. According to industry standards from organizations like the Natural Stone Institute, heavier materials like stone or composite basins require a sturdy, non-porous countertop and often need additional support structures made from plywood or specialized brackets to distribute weight safely.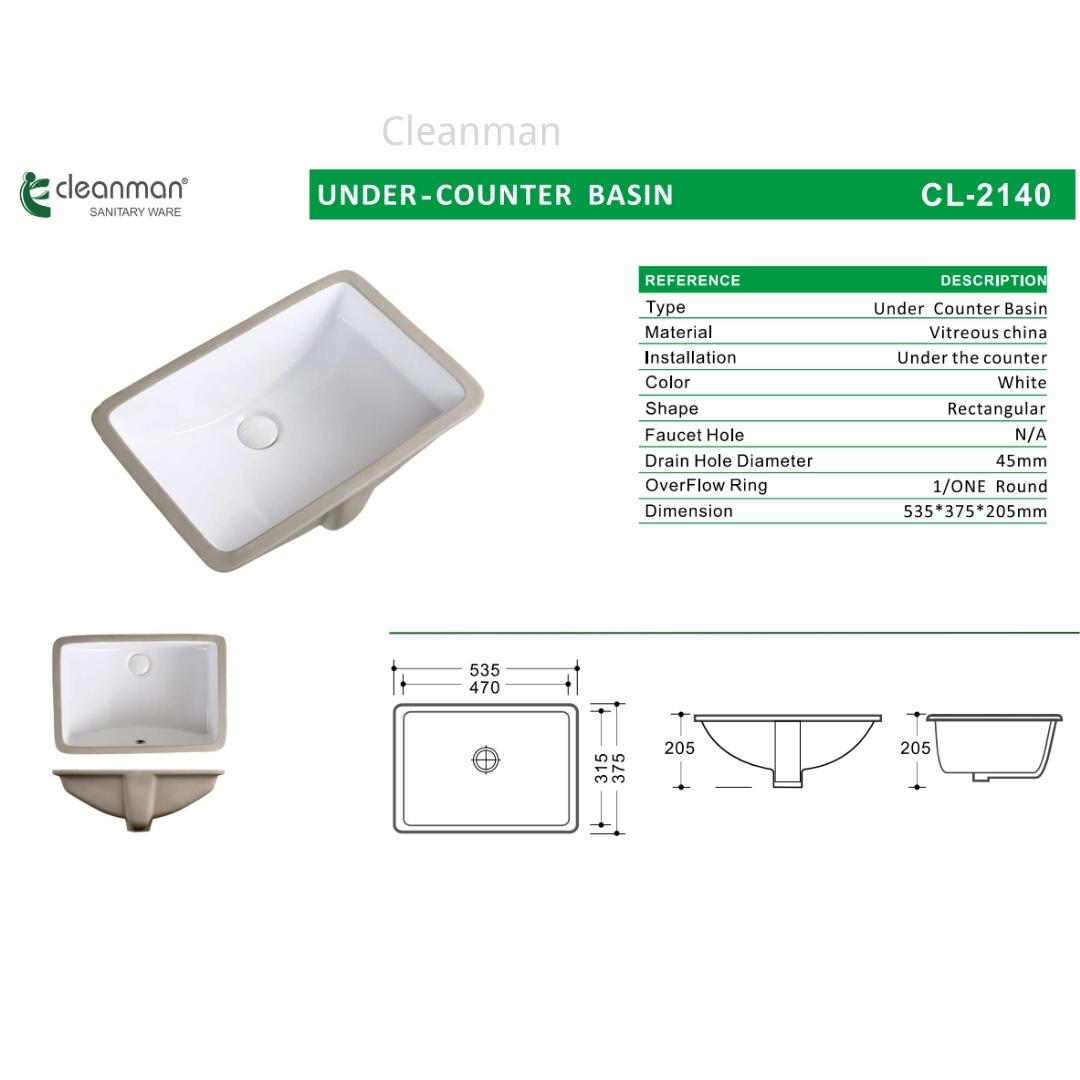
Phase 6: Design Trends for 2026
In the B2B world, staying ahead of design trends is essential for moving inventory.
Mixing Materials: A major trend is pairing natural stone countertops with different basin materials to add texture and color.
Earthy Tones: We are seeing a shift toward muted greens, browns, and terracotta finishes in cabinetry and hardware.
Open Shelving: This choice adds a touch of modernity and a sense of openness to the bathroom environment.
Integration of Technology: Smart appliances and touchless fixtures are becoming standard in contemporary designs.
FAQ: Questions Every Importer Asks (A Tool for Your Sales Team)
Q1: Can we install these on any countertop?
A: Undermount sinks require sturdy, non-porous surfaces like granite, quartz, or solid stone. Never install them on laminate or wood-core counters, as water will rot the base material.
Q2: What is the most common reason a sink fails?
A: Usually, it’s improper initial preparation (Step 1) or inadequate physical support (Clips/Hooks).
Q3: How do we maintain the finish?
A: Use only mild, non-abrasive cleaners. Harsh chemicals can eat away at the silicone seal over time.
Q4: Why do I need a physical load test?
A: For large multi-unit projects, you need data to prove the sink can withstand real-world use without cracking the flange under pressure.
Q5: What should I do if the sink is warped?
A: Minor warping is standard in ceramic, but significant issues prevent a flush fit. A quality manufacturer (Step 0) mitigates this risk.
Q6: Can I use any type of caulk?
A: No, a 100% mildew-resistant silicone sealant is essential for a watertight, durable, and mold-free bond.
Q7: What do I do if the sink sags?
A: Tighten the clips immediately and inspect the silicone bead. You may need to add specialized support structures like brackets.
Q8: How do I prevent mold growth?
A: Recommend that your customers visually check the caulking every six months as a preventive maintenance measure.
Q9: Do stone sinks need special clips?
A: Yes, heavy stone or composite sinks usually require heavy-duty brackets or even a “sink harness” in addition to standard clips.
Q10: Can you produce with my logo?
A: Yes, sure, we are flexible to work on OEM and ODM projects.
Case Study: From Newcomer to Market Leader
We recently worked with a customer who was transitioning from trading general hardware to specializing in ceramic basins. They were concerned about the technical complexity of undermount basin installation.
The Challenge: They needed to prove to their local contractors that ceramic undermounts were as reliable as stainless steel.
Our Solution: We provided them with a step-by-step testing protocol. We sent them load-test data and high-resolution installation guides for their marketing materials. We coached them on how to teach their installers to use the provided templates.
The Result: By focusing on the technical “how-to,” they eliminated installation errors. Their basins became their “boosting business,” and they are now one of the leading suppliers of ceramic undermounts in their region.
Find your next bestseller in our exclusive undermount basin collection.

